
The Microsoft .NET Framework is an important feature of the modern Windows operating system. It provides developers with a ready-made collection of code that Microsoft maintains. Most of the time, you have no direct dealings with .NET Framework. However, that’s not always the case. At times, you need to know the specific version of the .NET Framework installed on your system.
Here are six ways you can find out which versions of .NET Framework are installed on your version of Windows.
Find Newer .NET Framework Versions: 4.5 and Later
There are three methods you can use to find out your .NET Framework version for versions 4.5 and later. “But Gavin,” I hear you say, “I’m doing this to find out which version I have, I don’t know if it is version 4.5 or not.”
You are exactly right. Checking for the .NET Framework version only takes a moment. You can quickly establish if you have .NET Framework version 4.5 or later. If you don’t, you can safely assume that you have an earlier version installed, or no .NET Framework version at all (which is highly unlikely).
1. Use the Registry Editor to Find the .NET Framework Version
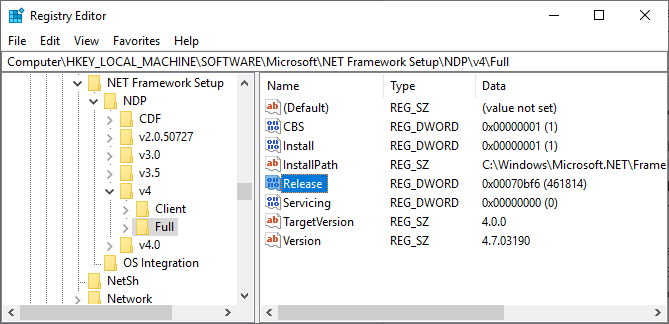
You can find the .NET Framework versions installed on your system in the registry. (What is the Windows Registry, anyway?)
- Press Ctrl + R to open Run, then input regedit.
- When the Registry Editor opens, find the following entry:
HKEY_LOCAL_MACHINE\SOFTWARE\Microsoft\NET Framework Setup\NDP\v4 - Under v4, check for the Full If it is there, you have .NET Framework version 4.5 or later.
- In the right-hand panel, check for a DWORD entry named Release. If the Release DWORD exists, you have .NET Framework 4.5 or a later version.
- The Release DWORD data contains a value relating to the specific .NET Framework version. For instance, in the image below, the Release DWORD has a value of 461814. That means my system has .NET Framework 4.7.2 installed. Check the table below for your Release DWORD value.
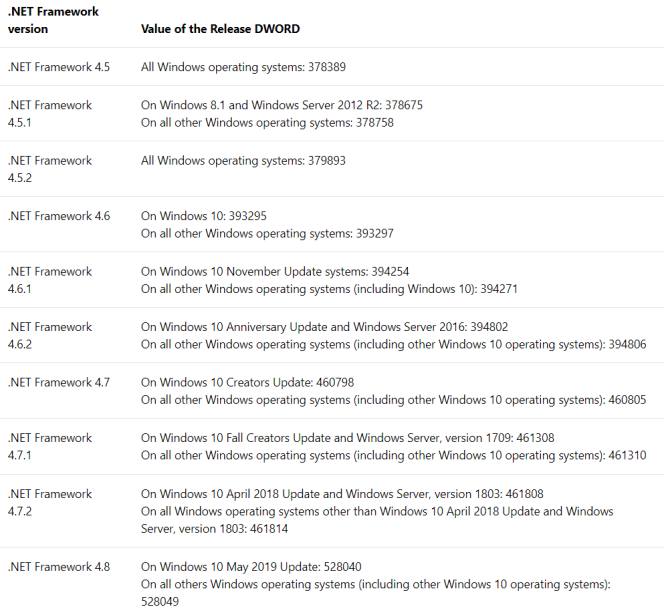
You can cross-check the DWORD value against the value table below to find out the exact .NET Framework version on your system.
2. Use the Command Prompt to Find the .NET Framework Version
Type command into your Start Menu search bar, right-click the Best Match and select Run as Administrator.
Now, copy and paste the following command into the Command Prompt:
reg query "HKLM\SOFTWARE\Microsoft\Net Framework Setup\NDP\v4" /s
The command lists the installed .NET Frameworks for version 4. .NET Framework version 4 and later display as “v4.x.xxxxx.”
3. Use PowerShell to Find the .Net Framework Version

Type powershell into your Start Menu search bar, right-click the Best Match and select Run as Administrator.
Now, you can use the following command to check the value of the .NET Framework Release DWORD:
Get-ChildItem 'HKLM:\SOFTWARE\Microsoft\NET Framework Setup\NDP\v4\Full\' | Get-ItemPropertyValue -Name Release | Foreach-Object { $_ -ge 394802 }
The command above returns True if the .NET Framework version is 4.6.2 or higher. Otherwise, it returns False. You can use the .NET Framework DWORD value table above to swap out the last six digits of the command for a different version. Check out my example:
The first command confirms that version 4.6.2 is present. The second confirms that version 4.7.2 is present. However, the third command checks for version 4.8, which I don’t have installed yet as the Windows 10 May Update hasn’t arrived on my system. Still, you get the gist of how the PowerShell command works with the DWORD value table.
Find an Older .NET Framework Version
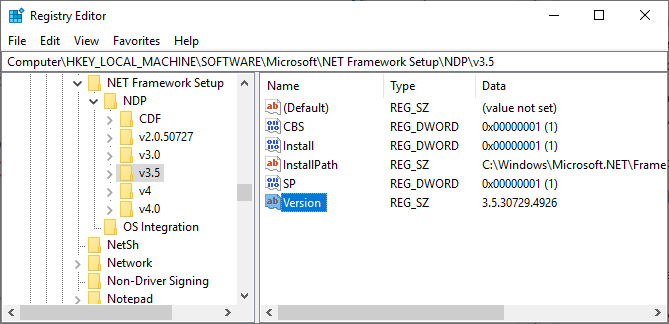
You can find out which old .NET Framework versions are installed on your system using the registry. The Registry Editor holds all the answers.
- Press Ctrl + R to open Run, then input regedit.
- When the Registry Editor opens, find the following entry:
HKEY_LOCAL_MACHINE\SOFTWARE\Microsoft\NET Framework Setup\NDP - Check the NDP file in the registry for each .NET Framework version.
Check Your .NET Framework Version Using a Third-Party Tool
There are a couple of tools you can use to find the .NET Framework version on your system automatically. However, they’re not updated frequently, which is why knowing the manual method is handy, too.
1. Raymondcc .NET Detector
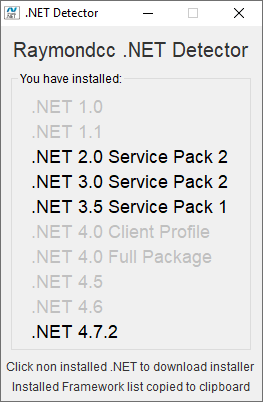
The Raymondcc .NET Detector is one of the fastest and easiest detection tools to use. You download the folder, extract it, then run the executable. When the program runs, it shows a list of .NET Framework versions. The versions in black are installed on your system, while the gray versions are not. If you click on a grayed-out .NET Framework version, the program takes you to the installer.
Download: Raymondcc .NET Detector for Windows (Free)
The archive password is raymondcc
2. ASoft .NET Version Detector
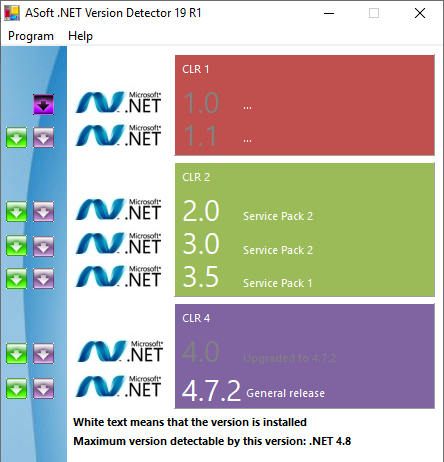
The ASoft .NET Version Detector works very similarly to the Raymondcc .NET Detector. Once you download and extract the program, run the executable. The program shows a list of currently installed .NET Framework versions. It also provides download links for those versions you do not have.
Download: ASoft .NET Version Detector for Windows (Free)
Simple Methods to Check Your .NET Framework Version
You now know several simple methods to check your .NET Framework version.
It isn’t always necessary to check your .NET Framework version. Many programs will check the version before installing and tell you if there is a program. Others will install the necessary version before commencing the installation, saving you the job of finding out the correct version and the hassle of downloading.
Still, it is always handy to know how to find the .NET Framework version manually. Want to find out more about the .NET Framework? Here’s why you need it and how you install it on Windows 10.
Read the full article: 6 Ways to Check Which Versions of .NET Framework Are Installed
via MakeUseOf https://www.makeuseof.com/tag/check-versions-net-framework-installed/
Comments
Post a Comment