Windows 10 throws up a dazzling array of error messages and stop codes when things go wrong. When a blue screen of death (BSOD) error hits, you can use the Windows stop code to pinpoint and fix the issue.
At times, stop codes issue for very specific errors. At other times, you might have to work through a range of Windows 10 fixes. The Windows 10 “Memory Management” stop code involves the latter.
In this article, we help you resolve your memory management BSODs, one fix at a time.
What Is Windows Memory Management?
Memory management is vital to keep your operating system ticking over nicely. Memory management is the function that manages your system memory. (I hear you say, “Duh, Gavin, it’s in the title!”) Properly working memory management, however, is vital to your system health.
When memory management goes wrong, your system will start showing BSODs at regular intervals. Here’s why:
Memory management essentially tracks every memory location on your system, regardless of status. It manages the transition of memory and processes between your RAM and physical memory during execution, deciding how much memory to allocate (and how much is available for allocation). When you close a program, it reallocates that memory to other processes or marks it available for use.
Unfortunately, memory management isn’t absolved of system errors, just like the rest of your system. And when it does crash, it takes your system with it.
The Memory Management Blue Screen Error
Simply put, a memory management BSOD means there’s been a critical memory management error. There are several well-known causes for memory management errors:
- Faulty RAM
- Issues with new hardware, such as a graphics card
- Faulty drivers
- Software issues, including corrupt system and operating system files
- Disk errors
At times, your system might recover after a simple reset. If you encounter a Memory Management BSOD, restart your system and see if the error returns. If not, there is a chance it was a one-off.
So how do you fix it? Here are a few things you can try.
1. Update Windows 10
The first thing to do is check that Windows 10 is completely up to date. Outdated system files can cause unexpected errors. Checking for a pending update is a quick and easy way to figure out if that is what is causing your issue.
Hit Windows key + I to open the Settings panel. Now, head to Update & Security, then check under Windows Update for any pending updates. If there is an update, save any important files, then press Restart now. Your system will reboot during the process.
2. Run Windows 10 Memory Diagnostic Tool
You can use the integrated Windows Memory Diagnostic utility to check if your system RAM is working correctly. The Memory Diagnostic tool runs after a system reboot. It checks your system memory for errors and logs the scan to a text file for analysis.
Type Windows Memory Diagnostic into your Start menu search bar and select the best match. You have two options: reboot immediately and run the utility, or set the utility to run after your next reboot. As you are trying to fix your memory management BSODs, save any important documents and reboot your system immediately. The Windows Memory Diagnostic runs immediately after reboot.
The log file, however, isn’t apparent after you boot back into Windows 10. Press Windows key + X and select Event Viewer from the power menu. In the Event Viewer, select Event Viewer (Local) > Windows Logs > System. Then, in the right-hand column select Find and type MemoryDiagnostic into the box. Hit Find Next. Your diagnostic results will display in the bottom of the window.
From there, you need to investigate any specific errors the Windows Memory Diagnostic throws up.
3. Run MemTest86
Windows Memory Diagnostic doesn’t show any errors. But you’re sure the issue relates to your system RAM. If that’s the case, you can use MemTest86 to perform an in-depth memory test.
MemTest86 is a free, standalone memory testing tool for x86 machines. You boot MemTest86 from a USB flash drive (or bootable disc) and leave it to check your system RAM. Now, a MemTest86 RAM check takes a long time to complete; a single pass takes hours depending on the amount of RAM you have installed.
Want to give it a try? Check out “Step 7: Check Your RAM Using MemTest86” in our guide to fixing the WHEA Uncorrectable Error. It has all the instructions you need!
4. Update Your Drivers
Another quick and handy potential fix is to update your system drivers. New software or hardware may come with new drivers, and your system might not have got the message. Driver faults are less common than in the days of computing yore, especially as Windows 10 now handles driver updates, by and large. But that’s not to say they don’t happen.
Press Windows Key + I to open the Settings panel, then select Update & Security > View update history. You can find any driver updates here. Now, type device manager in the Start menu search bar and select the best match. Head down the list and check for an error symbol. If there is nothing, your driver status is likely not the source of the issue.
That said, you can use a third-party tool to update all of your system drivers simultaneously. Check out this list of free tools you can use to fix the majority of Windows problems. The first two options—IOBit’s Driver Booster and Snappy Driver Installer—do exactly this.
GPU Drivers
A common theme throughout Memory Management BSOD threads and forum posts is that, at times, outdated or brand-new GPU drivers can cause the BSOD. Give some attention to your GPU drivers and double-check your last update.
5. Run CHKDSK
CHKDSK is a Windows system tool that verifies the file system and with certain settings, fixes issues as it runs. You run CHKDSK from the Command Prompt, and it has a bunch of nifty features.
Type command prompt in your Start menu search bar, then right-click the best match and select Run as administrator. (Alternatively, press Windows key + X, then select Command Prompt (Admin) from the menu.)
Next, type chkdsk /r and press Enter. The command will scan your system for errors and fix any issues along the way.
6. Run SFC

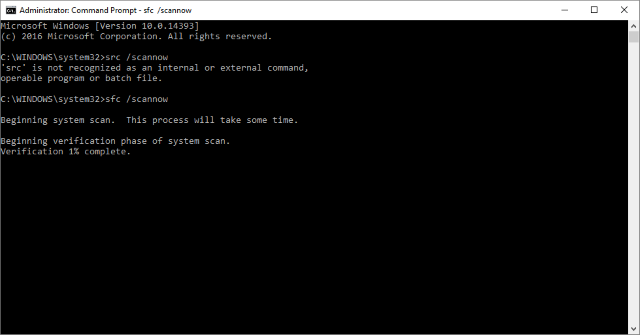
Memory management still occurring? System File Check is another Windows system tool that checks for missing and corrupt Windows system files. Sounds like CHKDSK, right? Well, SFC checks for Windows system files specifically, while CHKDSK scans your entire drive for errors.
But before running the SFC command, it is best to double-check that it is completely functional.
DISM stands for Deployment Image Servicing and Management. DISM is an integrated Windows utility with a vast range of functions. In this case, the DISM Restorehealth command ensures that our next fix will work properly. Work through the following steps.
- Type Command Prompt (Admin)in the Start menu search bar, then right-click and select Run as administrator to open an elevated Command Prompt.
- Type the following command and press Enter: DISM /online /cleanup-image /restorehealth
- Wait for the command to complete. The process can take up to 20 minutes depending on your system health. The process seems stuck at certain times, but wait for it to complete.
- When the process completes, type sfc /scannowand press Enter.
7. Check Physical Hardware
Last but not least, physically check your system hardware. Did you move your system recently? There’s a small chance your hardware unseated during the process. Only a small chance, but something worth checking!
8. Reset Windows 10 (Last Resort)

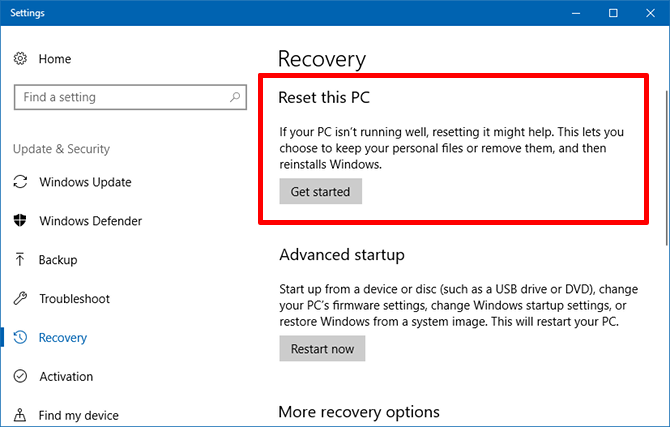
Okay, still tearing your hair out? Sometimes nothing other than a Windows 10 Reset will completely fix your problem. Windows 10 Reset replaces your system files with a completely fresh set of files and theoretically clears lingering issues relating to the Memory Management error while keeping the majority of your important files intact.
Head to Settings > Update and Security > Recovery, then under Reset this PC select Get started. Your system restarts as soon as you hit the button, so make sure you to backup any important files beforehand. Your system will restart, then you may select Keep my files or Remove everything.
The Memory Management Stop Code Error Fixed
Memory Management BSODs are difficult to take care of. Many variables can lead to a Memory Management BSOD, and that’s exactly why diagnosing a direct issue is sometimes problematic. However, one of the above fixes will bring your system back from the brink so you can continue your work free of any BSOD for now.
Still struggling with the Memory Management BSOD? You can use BlueScreenView for a slightly more user-friendly method for BSOD dump file analysis. Give it a try!
Read the full article: How to Fix the Windows Stop Code Memory Management BSOD
via MakeUseOf https://ift.tt/2LHHLLC
ReplyDeleteVery useful info,
This article important the for me is.
Keep it up and thanks to the writer.
Amazing write-up,
Thanks!!!!!!!!… ??
whea uncorrectable error